


Once, watching a popular TV program where the audience is offered to make a modern design in the room and then show it on television, I saw this miracle of engineering. Such a decision could not even come to mind. Mechanical brackets and lifts for household purposes. Recently, this could only be seen in science fiction movies, where homes of men, starships are fitted with a range of mechanical devices that perform most household functions automatically.
About DIY TV lift cabinet
Together with the enthusiastic owners of the modified interior, you begin to understand the behavior of mechanical drives which bring a new period of applied technological devices creation. And it is possible not only to find on TV, but to become an owner of such a device. Many things were created to increase the degree of human comfort. When TV appeared, it was perceived as a breakthrough into a new reality. There was no need to go to the cinema to see a new movie. We could watch all the news and movies at home. The television was usually set in a large room, turning it into a home cinema. Everyone gathered in the living room and the movie show began. But time goes by, bringing with it new trends and technologies. Huge TV boxes of previous generations gradually disappeared from our everyday life. The new equipment has a modern and compact appearance, has stronger technical characteristics. However, the problem of the location of the new flat screens remained.
How does it work?
For this purpose, the industry produces a wide range of all kinds of lifts and actuators. You can choose some of them here – Progressive Automations. When choosing the type of mount, think about how exactly you want to watch TV. Just fix the panel to the wall statically without rotating or moving the screen? A fixed bracket will help to firmly and securely “press” the TV to the surface, saving you as much space as possible. However, this type of attachment has certain functional limitations. If you have to constantly change the viewing point, you should opt for motorized brackets or foot of the bed tv lifts. This will help (without getting up) to coordinate the position of the screen in the direction you want. Trainable control panels are used. You do not have to use different remotes, both devices, TV and lift, will be controlled by a single remote. Modern models of tv stand for the foot of the bed lifts allow you to significantly adjust the angles of rotation, creating different areas for watching TV.
How to choose a TV lift cabinet for end of the bed?
There are several ways to place the TV in the room space. It can be placed in a closet, mounted on a separate bedside table, at the foot of the bed or hung on brackets to the wall. Of this series, the last option is most suitable. It gives many advantages.
- There is an additional space in the room, which can be used for other purposes.
- The TV is located out of the reach of others, which increases its safety. The risk of damage from accidental careless actions of family members, especially children, is reduced.
- It is possible to set it so that the view of the screen was convenient from all sides.
Alternatively, the TV can be placed in the headboard or the bedside dresser, equipped with a retractable motorized Elevator. There are a sufficient number of options for elevators, they serve the rise of both small screens with a diagonal of up to 32″, and large plasmas and LCDs. The mechanisms themselves are not large and easily built into any bedside table and a fairly thin headboard.
All of them are controlled by remote control or built-in furniture button. The remaining useful space in the back can be used to store a variety of small items, disks or equip under the bar. The cost of such lifts also varies, but approximately doubles the price of the TV.
Another plus — in this way you can hide the fact of the presence of the TV in the interiors with a certain style (classic, Provence, shabby chic), where visually the TV does not fit.
A lift can be built into the ceiling, then the TV will descend from a specially equipped niche.
By embedding this technique in your interior, you give your home a modern style and functionality. We advise you to pay attention to the products of those companies that produce a wide range of fastening elements. The wider the range, the more likely price stability, uninterrupted supply, high-quality products.
How to build a TV lift cabinet for end of bed
Step 1: Build the Main part
First thing to do is build the end of bed tv lift cabinet/drawer’s main structure. This will vary from project to project depending on the cabinet you are having, but you essentially want to bring the device together so you can decide what needs to be changed to fit the Pop Up TV Lift.
Step 2: Liftable Top or Hinged
We headed to a hinged top where a part of the roof hinges at the back and extends out of the cabinet as the screen moves.
I’ve heard about people with a top lift section straight up with a TV, you’d just need a bracket or something to attach the top of the lift column to the top of the cabinet. This way will work, as long as the television opens up. Otherwise, kind of meaningless!
So we cut a portion of the top based on how far the column came from the TV lift and the TV.
We then used to attach the hinges to some 2×4 on either side of the inside of the cabinet. To fit the hinge, make sure you fall the 2×4 down a touch so that the top of the cabinet can still be flat with the hinges attached (see picture).
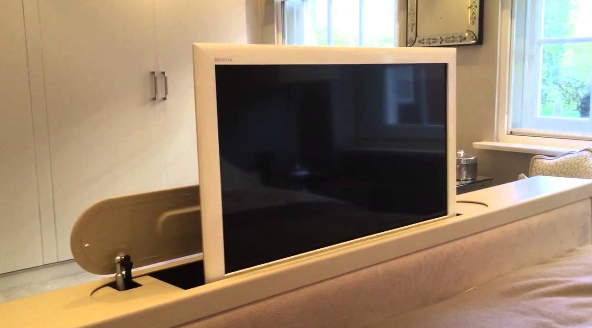
Step 3: Mount the column of the Pop Up Screen Lift
The next thing we did was to install the column of the Pop-Up TV Lift within the container. Depending on how you do it, you may need to leave a small bit of room to add a backup.
You’re going to want to make sure that at the base the Pop-Up TV Lift column has very strong support. Because we used a cheap (read-cheap) cabinet, the bottom was a particle board that was not solid enough. We placed a large piece of wood underneath, where normally there would only be dead space. At the base, this gave us a very strong support.
Step 4: Completing the Cabinet
First, by adding the front drawer heads, we finished building the container. We secured them with the finishing nails, but you could add them from the back and have no external evidence.
Step 5: Attach the TV and Finishing Touches
We had the TV put on the Pop-Up TV Lift first thing we did. With the adjustable TV mount that comes with the Pop-Up TV Lift Package, this was fairly straight forward.
The power/control box was put inside the cabinet and the cable was connected to the Pop-Up TV Lift board, then the power box was plugged into the wall.
A remote control button push and things are going on!
A few tweaks here and there, including adding a rounded corner section of 2×4. In the photo, you can see that it is placed on top of the column to allow the lid to hinge. You may be able to do a much more graceful and beautiful looking ‘ lid lifter, ‘ but this has been good for the time being.
We also added a cardboard flap to the backside of the television lift so that when the television came down, the hinged lid would not catch. Not high tech again, but the job was done.
Step 6: Done! TV Lift for a bed in Just a Few Hours.
Now, with a remote control button, the TV moves effortlessly out of the box. It makes for a nice diversion in the workplace or at home, rising to the viewing spot in less than 30 seconds.

 POSTED BY